Apache Hop server web service setup
Introduction
Section titled “ Introduction”The web service component of Apache Hop allows you to expose data and functionality through a web interface, making it accessible via HTTP requests.
Don’t let the slightly dated user interface deceive you. Give Hop a chance because, beneath the surface, it’s a highly powerful and efficient data integration platform. Even though I’ve experimented with various innovative BI software, I consistently return to Pentaho, and now Apache Hop, for building complex ETL processes.
Requirements
Section titled “ Requirements”Make sure the Hop Server is configured to use a project and an environment. Also make sure the metadata of the project is used.
To setup the web service and build pipelines and workflows, you need to download the Hop GUI. Alternatively, you can use Hop Web (currently in development). I’ll be using the Hop GUI on Windows and starting it with hop-gui.bat.
-
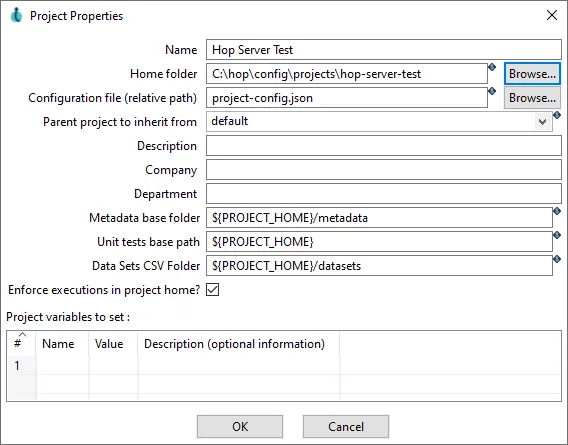
Create a new project:
-
Use lifecycle environments, for example, to create a
developmentenvironment andproductionenvironment. Then you can configure variables for each environment. As an example I have added the following environment and variable: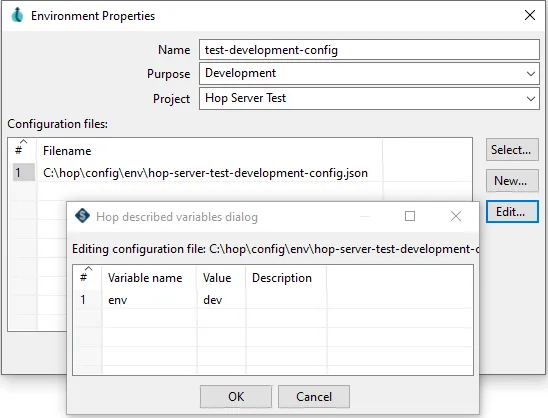
-
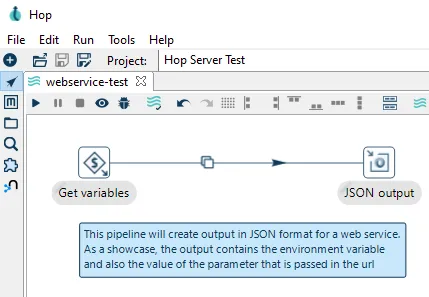
Create a pipeline by clicking
File>NewandPipeline. Then I will only add two transforms/steps: FirstGet variableswith a field containing the value of the environment variable and a field containing the value of the parameter passed in the url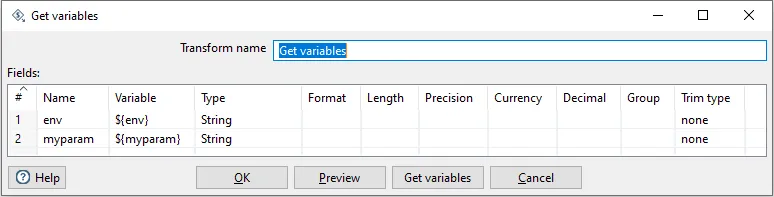
And second
JSON outputwhich will return a JSON output block and the fields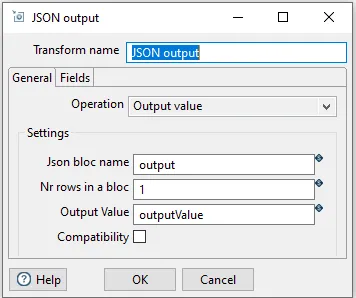
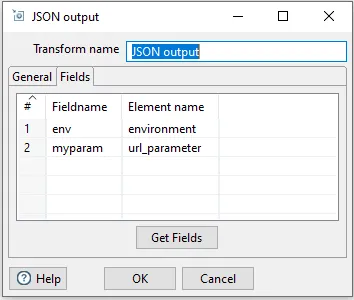
Now the pipeline looks like this:
And this is the XML of the pipeline which you can use:
<?xml version="1.0" encoding="UTF-8"?><pipeline><info><name>webservice-test</name><name_sync_with_filename>Y</name_sync_with_filename><description/><extended_description/><pipeline_version/><pipeline_type>Normal</pipeline_type><pipeline_status>0</pipeline_status><parameters></parameters><capture_transform_performance>N</capture_transform_performance><transform_performance_capturing_delay>1000</transform_performance_capturing_delay><transform_performance_capturing_size_limit>100</transform_performance_capturing_size_limit><created_user>-</created_user><created_date>2022/02/11 14:12:00.289</created_date><modified_user>-</modified_user><modified_date>2022/02/11 14:12:00.289</modified_date><key_for_session_key>H4sIAAAAAAAAAAMAAAAAAAAAAAA=</key_for_session_key><is_key_private>N</is_key_private></info><notepads><notepad><note>This pipeline will create output in JSON format for a web service.As a showcase, the output contains the environment variableand also the value of the parameter that is passed in the url</note><xloc>80</xloc><yloc>128</yloc><width>348</width><heigth>58</heigth><fontname>Segoe UI</fontname><fontsize>9</fontsize><fontbold>N</fontbold><fontitalic>N</fontitalic><fontcolorred>14</fontcolorred><fontcolorgreen>58</fontcolorgreen><fontcolorblue>90</fontcolorblue><backgroundcolorred>201</backgroundcolorred><backgroundcolorgreen>232</backgroundcolorgreen><backgroundcolorblue>251</backgroundcolorblue><bordercolorred>14</bordercolorred><bordercolorgreen>58</bordercolorgreen><bordercolorblue>90</bordercolorblue></notepad></notepads><order><hop><from>Get variables</from><to>JSON output</to><enabled>Y</enabled></hop></order><transform><name>Get variables</name><type>GetVariable</type><description/><distribute>N</distribute><custom_distribution/><copies>1</copies><partitioning><method>none</method><schema_name/></partitioning><fields><field><name>env</name><variable>${env}</variable><type>String</type><format/><currency/><decimal/><group/><length>-1</length><precision>-1</precision><trim_type>none</trim_type></field><field><name>myparam</name><variable>${myparam}</variable><type>String</type><format/><currency/><decimal/><group/><length>-1</length><precision>-1</precision><trim_type>none</trim_type></field></fields><attributes/><GUI><xloc>80</xloc><yloc>48</yloc></GUI></transform><transform><name>JSON output</name><type>JsonOutput</type><description/><distribute>Y</distribute><custom_distribution/><copies>1</copies><partitioning><method>none</method><schema_name/></partitioning><outputValue>outputValue</outputValue><jsonBloc>output</jsonBloc><nrRowsInBloc>1</nrRowsInBloc><operation_type>outputvalue</operation_type><compatibility_mode>N</compatibility_mode><encoding>UTF-8</encoding><addtoresult>N</addtoresult><file><name/><extention>json</extention><append>N</append><haspartno>N</haspartno><add_date>N</add_date><add_time>N</add_time><create_parent_folder>N</create_parent_folder><DoNotOpenNewFileInit>N</DoNotOpenNewFileInit></file><fields><field><name>env</name><element>environment</element></field><field><name>myparam</name><element>url_parameter</element></field></fields><attributes/><GUI><xloc>384</xloc><yloc>48</yloc></GUI></transform><transform_error_handling></transform_error_handling><attributes/></pipeline> -
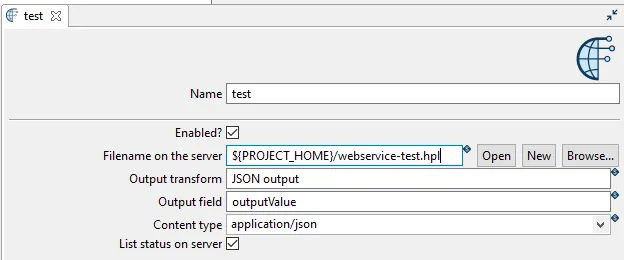
Create the web service metadata by clicking the
metadatabutton all the way left and in the list right-clickWeb Serviceand choose forNew. Enter the following:- Name: for example
test - Make sure Enabled is turned
ON - Filename on the server:
${PROJECT_HOME}/webservice-test.hpl - Output transform:
JSON output - Output field:
outputValue - Content type:
application/json - Turn List status on server
ONNow save the changes.
Now the
testweb service is added to your metadata: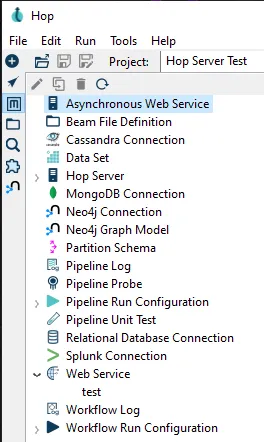
- Name: for example
-
Make sure everything is saved and copy the project with the metadata to the data folder of the Hop Server. Do the same with the environments (the env folder)
-
Make sure the Hop Server container is running and finally test if the web service works by entering the following url:
http://<hop server IP>:<hop server PORT>/hop/webService/?service=test&myparam=hopEnter your username and password and you will get the result in the browser:
{"output":[{"environment":"dev","url parameter":"hop"}]}The display of the json output may differ per browser.
The web service can also be tested with
cURL:# Open your terminal applicationcurl -i -H "Accept: application/json" -H "Content-Type: application/json" --user username:password -X GET http://<hop server IP>:<hop server PORT>/hop/webService/?service=test&myparam=hopWhen you look at the server status (
http://<hop server IP>:<hop server PORT>/hop/status). You will see that the pipeline is now added with statusFinished: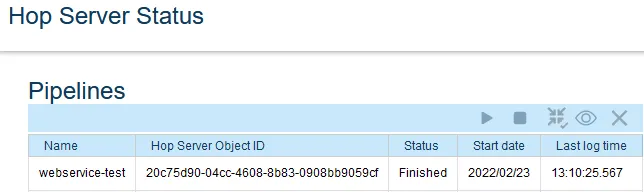
No comments found for this note.
Join the discussion for this note on Github. Comments appear on this page instantly.